

We’re an affiliate
We hope you love the products featured in our articles. Just so you know, we may collect a share of sales or other compensation from the links on this page. Thank you if you use our links, we really appreciate it!
Are you struggling to find a way to tighten a toilet seat with hidden fixings? This can be an arduous process – between finding what type of seat you have and figuring out how to get it tightened correctly, it can appear impossible.
But fear no more – we’re here to help make the seemingly-impossible possible. This article is a step-by-step guide for how to tighten a toilet seat with hidden fixings properly.
What type of toilet seat is it and where are the hidden fixings located?
Lets start by identifying what type of toilet seat you have and where the hidden fixings are located.
Identify the type of toilet seat
Depending on your particular model and brand, hidden fixings can be located differently; some models require you to unscrew the entire lid off while others may only need a few screws removed.
You can usually spot the model and brand of your toilet seat by looking for the manufacturer’s logo on the underside of the lid or underneath.
Find the hidden fixings
Locate the hidden fixings on your toilet seat. Many models have a small plastic tab that hides the screws – this tab may need to be unclipped or pried off in order to access them.
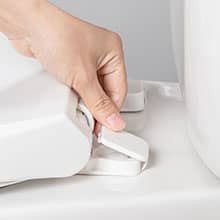
Other models have a button you hold while gently lifting the seat off.
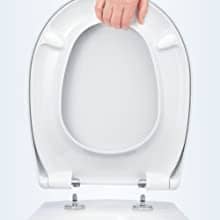
The release button can be located between the hinges too.

How to tighten a toilet seat with hidden fixings?
Once you’ve located the hidden fixings, it’s time to tighten them.
Unscrew the screws or nuts
Using a screw driver or wrench, carefully unscrew the screws or nuts that secure the seat to the bowl.
No products found.
Don’t forget to place a cloth under your tools so you don’t scratch up the porcelain.

Recommended article: How To Remove A Bemis Toilet Seat?
Adjust the seat
In some cases, you may need to adjust the seat itself in order to properly tighten the screws. Gently lift up on one side of the seat and push down on the other while holding it level. This will help ensure that all four corners are evenly secured in place.
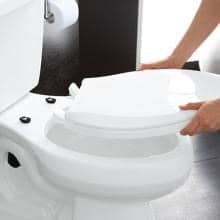
Tighten the screws or nuts
Once you’ve adjusted the seat, you’ll want to re-tighten the screws and/or nuts. Make sure that your tools are securely engaged so that you don’t accidentally strip the screws or damage the porcelain.
Replace any covers
If there were plastic tabs covering the screws, make sure you to re-clip or replace them once you’re done tightening the seat.
No products found.
Test the seat
Finally, test the seat by sitting on it and making sure that it doesn’t move or shift. If everything looks good, you’re all done!
Tips for preventing the need to tighten a toilet seat again
The best way to ensure that your toilet seat stays tight is to regularly check the screws and make sure they’re properly tightened. This will not only prevent shifting, but also prolong the life of your toilet seat.
If you use a particularly strong cleaner or chemical on your porcelain, be sure to wipe it off afterwards. This will help keep the porcelain from becoming corroded, which can loosen the screws.
Finally, if you’re looking to avoid having to tighten your toilet seat again anytime soon, consider investing in a higher-quality model with metal fixings.
No products found.
This should last longer and require less maintenance in the long run.
Recommended Article: Are Wooden Toilet Seats Sanitary?
Summary
Tightening a toilet seat with hidden fixings can be tricky, but it doesn’t have to be. Our step-by-step guide for properly tightening your seat and ensuring that it remains secure over time.
First, identify the type of seat you have and locate the hidden fixings on your model. Then, unscrew the screws or nuts, adjust the seat to make sure all four corners are evenly secured and re-tighten them.
Replace any plastic covers if necessary and check that your toilet seat is secure by sitting on it. If you take some preventative measures such as regularly checking the screws and using a higher-quality model with metal fixings can help avoid having to tighten your seat in the future.
And there you have it – you now have all the knowledge you need to tighten your toilet seat with hidden fixings. With just a little bit of patience and the right tools, you’ll be able to keep your toilet seat in place for years to come.
Related Articles
How To Fix A Low Water Level In Your Toilet Bowl?
How To Easily Remove A Bemis Toilet Seat?
Toilet Fills Up With Water Then Drains Slowly?